Raspberry Pi B+ Pinout Leaf. Contribute to splitbrain/rpibplusleaf development by creating an account on GitHub.
Source: splitbrain/rpibplusleaf
Source: splitbrain/rpibplusleaf
GPIO
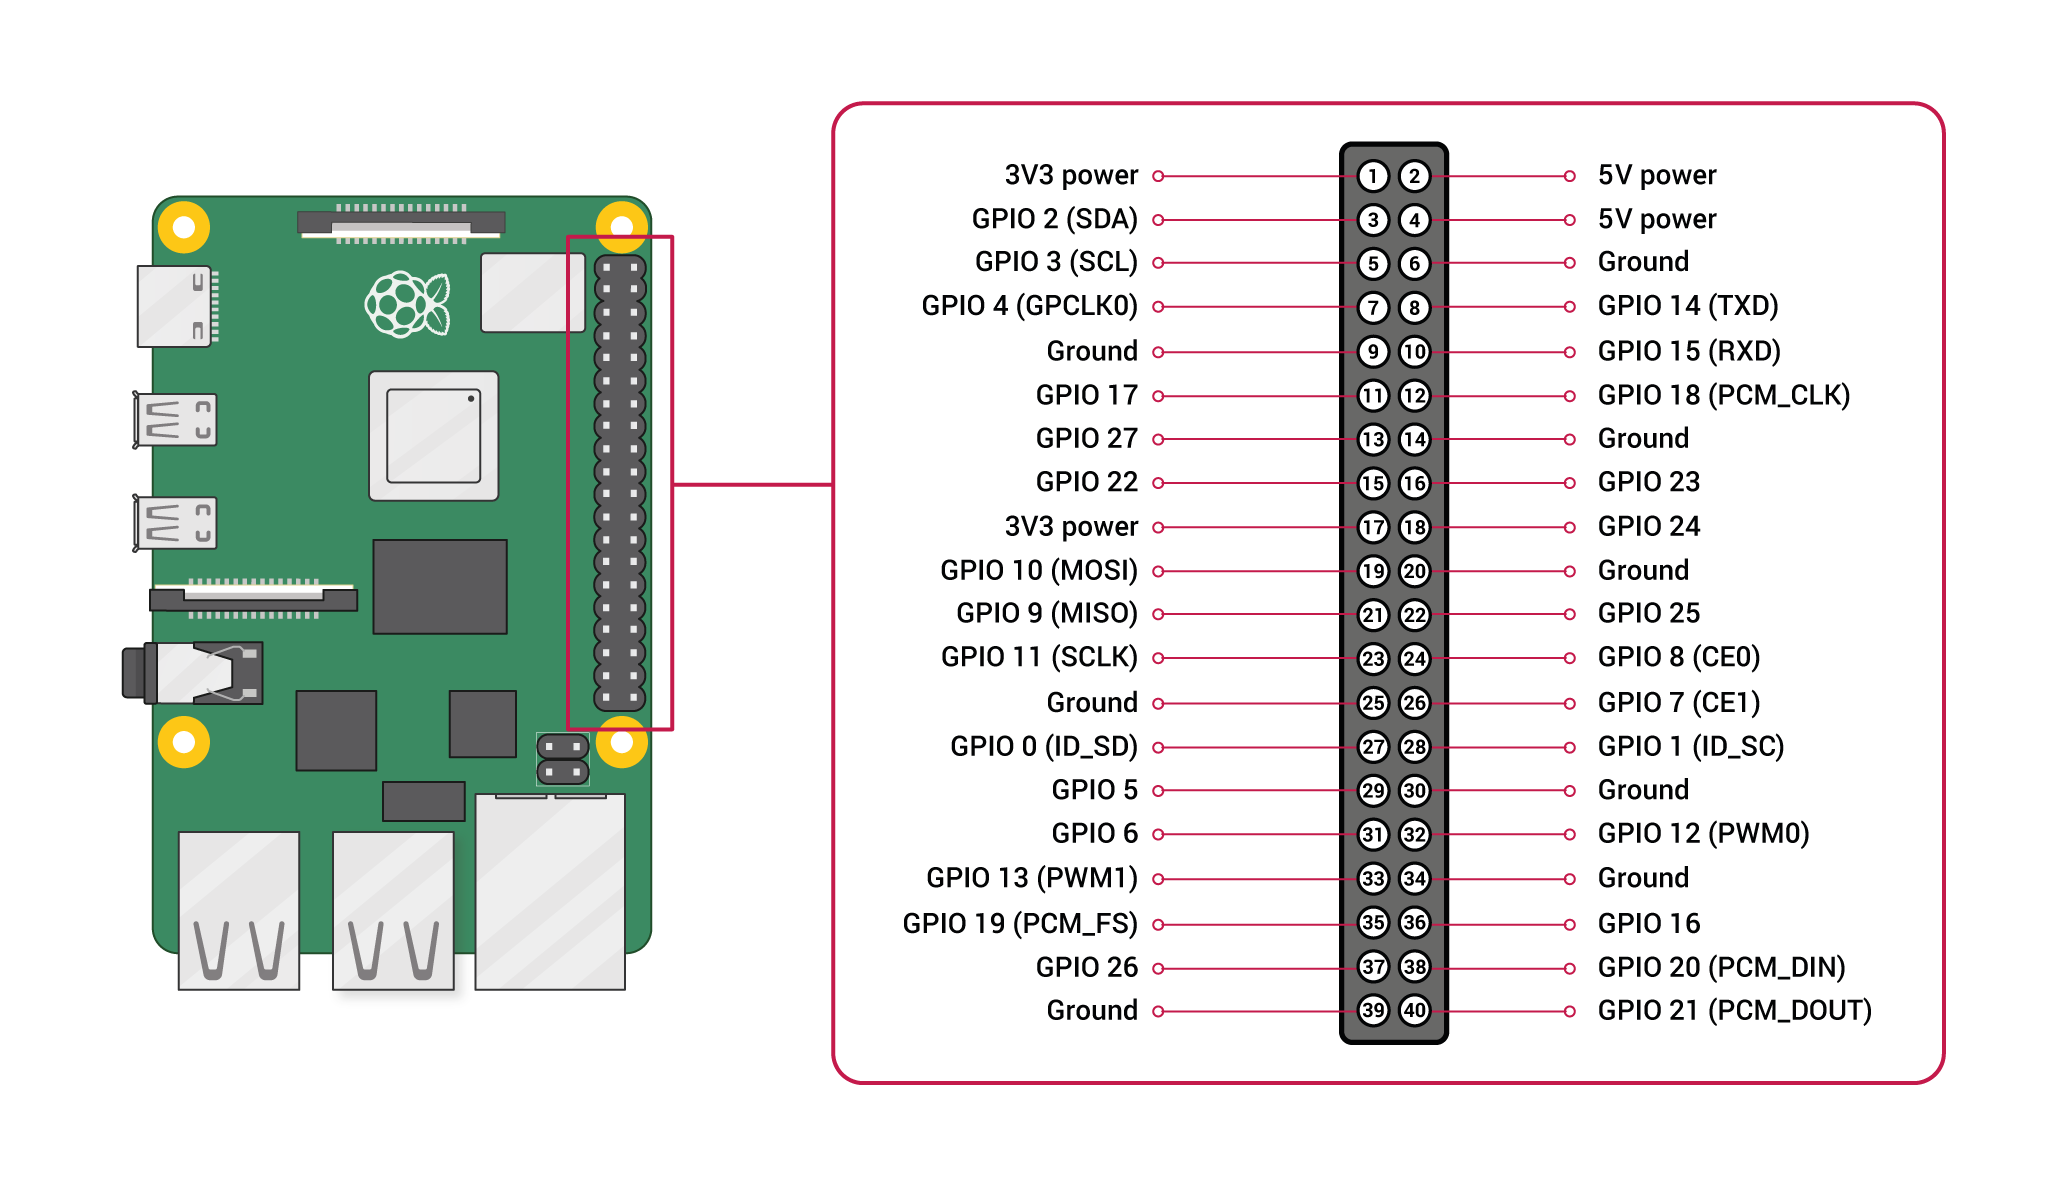
A powerful feature of the Raspberry Pi is the row of GPIO (general-purpose input/output) pins along the top edge of the board. A 40-pin GPIO header is found on all current Raspberry Pi boards (unpopulated on Pi Zero and Pi Zero W). Prior to the Pi 1 Model B+ (2014), boards comprised a shorter 26-pin header.
Any of the GPIO pins can be designated (in software) as an input or output pin and used for a wide range of purposes.
Note: the numbering of the GPIO pins is not in numerical order; GPIO pins 0 and 1 are present on the board (physical pins 27 and 28) but are reserved for advanced use (see below).
Voltages
Two 5V pins and two 3V3 pins are present on the board, as well as a number of ground pins (0V), which are unconfigurable. The remaining pins are all general purpose 3V3 pins, meaning outputs are set to 3V3 and inputs are 3V3-tolerant.
Outputs
A GPIO pin designated as an output pin can be set to high (3V3) or low (0V).
Inputs
A GPIO pin designated as an input pin can be read as high (3V3) or low (0V). This is made easier with the use of internal pull-up or pull-down resistors. Pins GPIO2 and GPIO3 have fixed pull-up resistors, but for other pins this can be configured in software.
More
As well as simple input and output devices, the GPIO pins can be used with a variety of alternative functions, some are available on all pins, others on specific pins.
- PWM (pulse-width modulation)
- Software PWM available on all pins
- Hardware PWM available on GPIO12, GPIO13, GPIO18, GPIO19
- SPI
- SPI0: MOSI (GPIO10); MISO (GPIO9); SCLK (GPIO11); CE0 (GPIO8), CE1 (GPIO7)
- SPI1: MOSI (GPIO20); MISO (GPIO19); SCLK (GPIO21); CE0 (GPIO18); CE1 (GPIO17); CE2 (GPIO16)
- I2C
- Data: (GPIO2); Clock (GPIO3)
- EEPROM Data: (GPIO0); EEPROM Clock (GPIO1)
- Serial
- TX (GPIO14); RX (GPIO15)
GPIO pinout
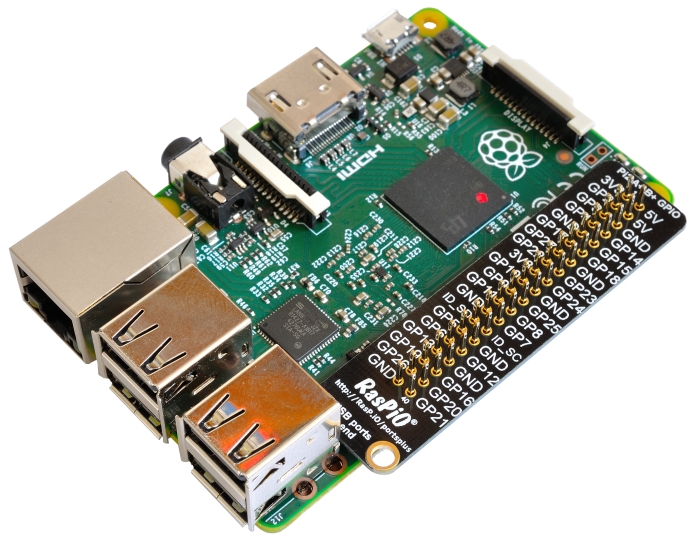
It’s important to be aware of which pin is which. Some people use pin labels (like the RasPiO Portsplus PCB, or the printable Raspberry Leaf).
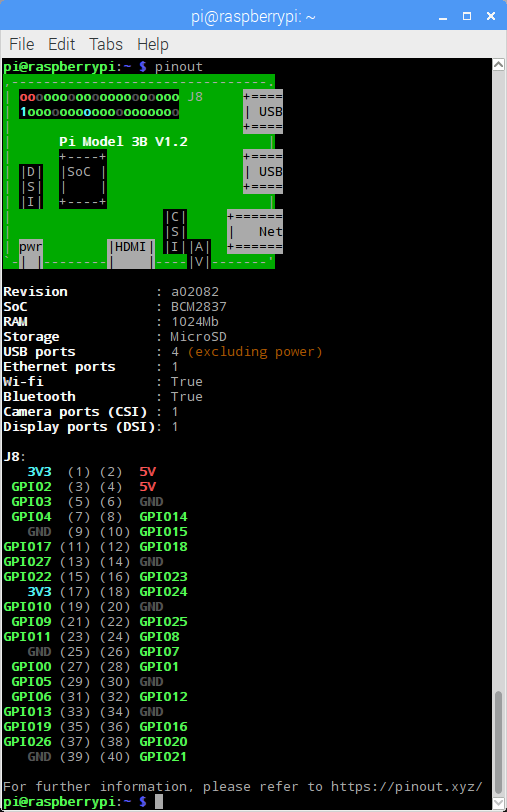
A handy reference can be accessed on the Raspberry Pi by opening a terminal window and running the command
pinout. This tool is provided by the GPIO Zero Python library, which is installed by default on the Raspberry Pi OS desktop image, but not on Raspberry Pi OS Lite.
For more details on the advanced capabilities of the GPIO pins see gadgetoid’s interactive pinout diagram.
Programming with GPIO
It is possible to control GPIO pins using a number of programming languages and tools. See the following guides to get started:
- GPIO with Scratch 1.4
- GPIO with Scratch 2
- GPIO with Python
- GPIO with C/C++ using standard kernel interface via libgpiod
- GPIO with C/C++ using 3rd party library pigpio
- GPIO with Processing3
Warning: while connecting up simple components to the GPIO pins is perfectly safe, it’s important to be careful how you wire things up. LEDs should have resistors to limit the current passing through them. Do not use 5V for 3V3 components. Do not connect motors directly to the GPIO pins, instead use an H-bridge circuit or a motor controller board.
Permissions
In order to use the GPIO ports your user must be a member of the
gpiogroup. Thepiuser is a member by default, other users need to be added manually.sudo usermod -a -G gpio <username>
The comprehensive add-on boards & GPIO Pinout guide for the Raspberry Pi
Source: Raspberry Pi GPIO Pinout
A: Modifying Windows Registry
Open Registry Editor, go to desired key and make changes.
B: Creating Registry Script File
Once you make changes, right-click on the registry key (which you modified) in left-side pane and select Export option.
It’ll open save dialog box to export the registry file. You just need to select the location to save the file and provide any desired name to the file. It’ll automatically create .REG file containing registry key information.
C: Editing Registry Script File
Now go to the folder containing registry script file which you created, right-click on the .REG file and select Edit option.
It’ll open the registry script file in Notepad. The format of registry script will look similar to following:
Windows Registry Editor Version 5.00
[Registry_Key_Path]
“String_or_DWORD_Name“=Value_data
The “Windows Registry Editor Version 5.00” line is essential. It defines Registry Editor version and you don’t need to edit this line. Keep it as it is. In Windows 98 and Windows NT operating systems, the Registry Editor version was defined as REGEDIT4 in registry script files.
“Registry_Key_Path” is the full path of the required registry key enclosed within square brackets ([]).
Under registry key path, name of string/DWORD/etc is written within double-quotes (“”) and after the equal (=) sign its value is written.
D: Removing Data from Registry Script File
If you want to remove any key or string/DWORD value from registry script file, you can delete its line from the file. Remember if you want to remove any particular key from the file, also remove all string/DWORD values mentioned under it.
E: Combining Multiple Registry Script Files
You can join different registry script files. Edit the files in Notepad and copy/paste one registry script contents into other registry script file. Remember the line “Windows Registry Editor Version 5.00” should always appear only once and at the beginning of the registry script file.
F: Deleting Keys and Values from Registry Editor Using Registry Script File
“Export” option of Registry Editor only allows to create registry scripts which can add/modify registry keys and values. But if you want to create a registry script which can delete an existing key or value from registry, then you’ll need to modify the registry script.
First export the registry key and value which you want to delete from registry via registry script file. Then edit the registry script file in Notepad.
Now if you want to delete a key from Registry Editor, simply add minus/hyphen (–) sign before the key path. For example, if your registry script file contains following key path:
[HKEY_CURRENT_USER\SOFTWARE\Microsoft\Windows\CurrentVersion\Policies\Explorer]
To delete “Explorer” key from Registry Editor, add minus/hyphen (–) sign before its path as shown following:
[–HKEY_CURRENT_USER\SOFTWARE\Microsoft\Windows\CurrentVersion\Policies\Explorer]
NOTE: Registry script will always delete the key from registry which is mentioned at the end of the path. In the above mentioned key path, “Explorer” key is mentioned at the end, so the line will only delete “Explorer” key from registry.
If you want to delete a value from Registry Editor, you’ll need to add minus/hyphen (–) sign after equal (=) sign following the value name in registry script file. For example, if your registry script file contains following value:
“NoDriveTypeAutoRun”=dword:000000FF
And you want to delete “NoDriveTypeAutoRun” value from Registry Editor via registry script file, then do as following:
“NoDriveTypeAutoRun”=–
When you’ll run registry script, it’ll automatically remove the mentioned key/value from Registry Editor.
Source: [Guide] How to Create Registry Script (.REG) Files in Windows – AskVG
Install the memory card into a computer.
Edit cmdline.txt. Append "init=/bin/sh" to the parameter string.
Save the file, then reinsert the mem card into the Pi and boot it.
Remount the file system as read/write: mount -o remount, rw /
Change the password: passwd pi
Bring the the Pi up to normal run level: sync; exec /sbin/init
Test password.
Shut down, remove the mem card. Use the other computer to edit cmdline.txt to remove the init cmd.
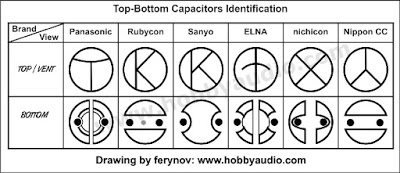
Capacitor Identification
Removing Meet Now via the Group Policy
System administrators may disable (or enable) the Meet Now icon on the Windows 10 taskbar using the Group Policy. The Group Policy is only available in professional editions of Windows 10, and not in Windows 10 Home.
Here is how that is done:
- You need elevated rights to use the Group Policy.
- Use Windows-R to open the runbox.
- Type gpedit.msc and select OK.
- Go to User Configuration > Administrative Templates > Start Menu and Taskbar
- Double-click on “Remove the Meet Now icon”.
- Set the feature to “Enabled” to hide the icon on the taskbar of the Windows 10 operating system.
- Restart the PC.
Removing Meet Now using the Registry
You may also remove Meet Now on Windows 10 using the Registry.
- Use Windows-R to open the runbox.
- Type regedit.exe and select OK.
- For individual users, go to HKEY_CURRENT_USER\Software\Microsoft\Windows\CurrentVersion\Policies\Explorer
- Right-click on Explorer and select New > Dword (32-bit) Value.
- Name it HideSCAMeetNow.
- Set its value to 1.
- For all users, go to HKEY_LOCAL_MACHINE\SOFTWARE\Microsoft\Windows\CurrentVersion\Policies\Explorer
- Right-click on Explorer and select New > Dword (32-bit) Value.
- Name it HideSCAMeetNow.
- Set its value to 1.
- Restart the PC.
Source: What is Meet Now in Windows 10 and how to remove it – gHacks Tech News
Excel recorded macro will have references to worksheet like this:
ActiveWorkbook.Worksheets("MystupidSpreadSheet(1)").ListObjects("Table_owssvr__2").Sort. _
    SortFields.Clear

You'll need to change the macro to reference the worksheet name by index number
ActiveWorkbook.Worksheets(1)
Understanding G-code commands is the key to your 3D printer. Quickly learn this code using our tutorial. Includes a list of all commands.